前言
Phase 3 結束後,我有一個 fine-tuned 的 DistilBERT 模型,存在本機的 ./phase3/finetuned_model/ 資料夾裡。
但「能跑」和「能用」是兩回事。本機模型只能我自己用,要讓其他系統呼叫它,需要把它變成一個 API。
Phase 4 的目標:把這個模型部署到 AWS SageMaker,讓它變成一個可以透過 HTTPS 呼叫的推論服務。
整個流程分三個大步驟(如圖 1 所示):
fine-tuned model(本機)
  → 打包成 model.tar.gz
  → 上傳到 S3
  → SageMaker Endpoint(HTTPS API)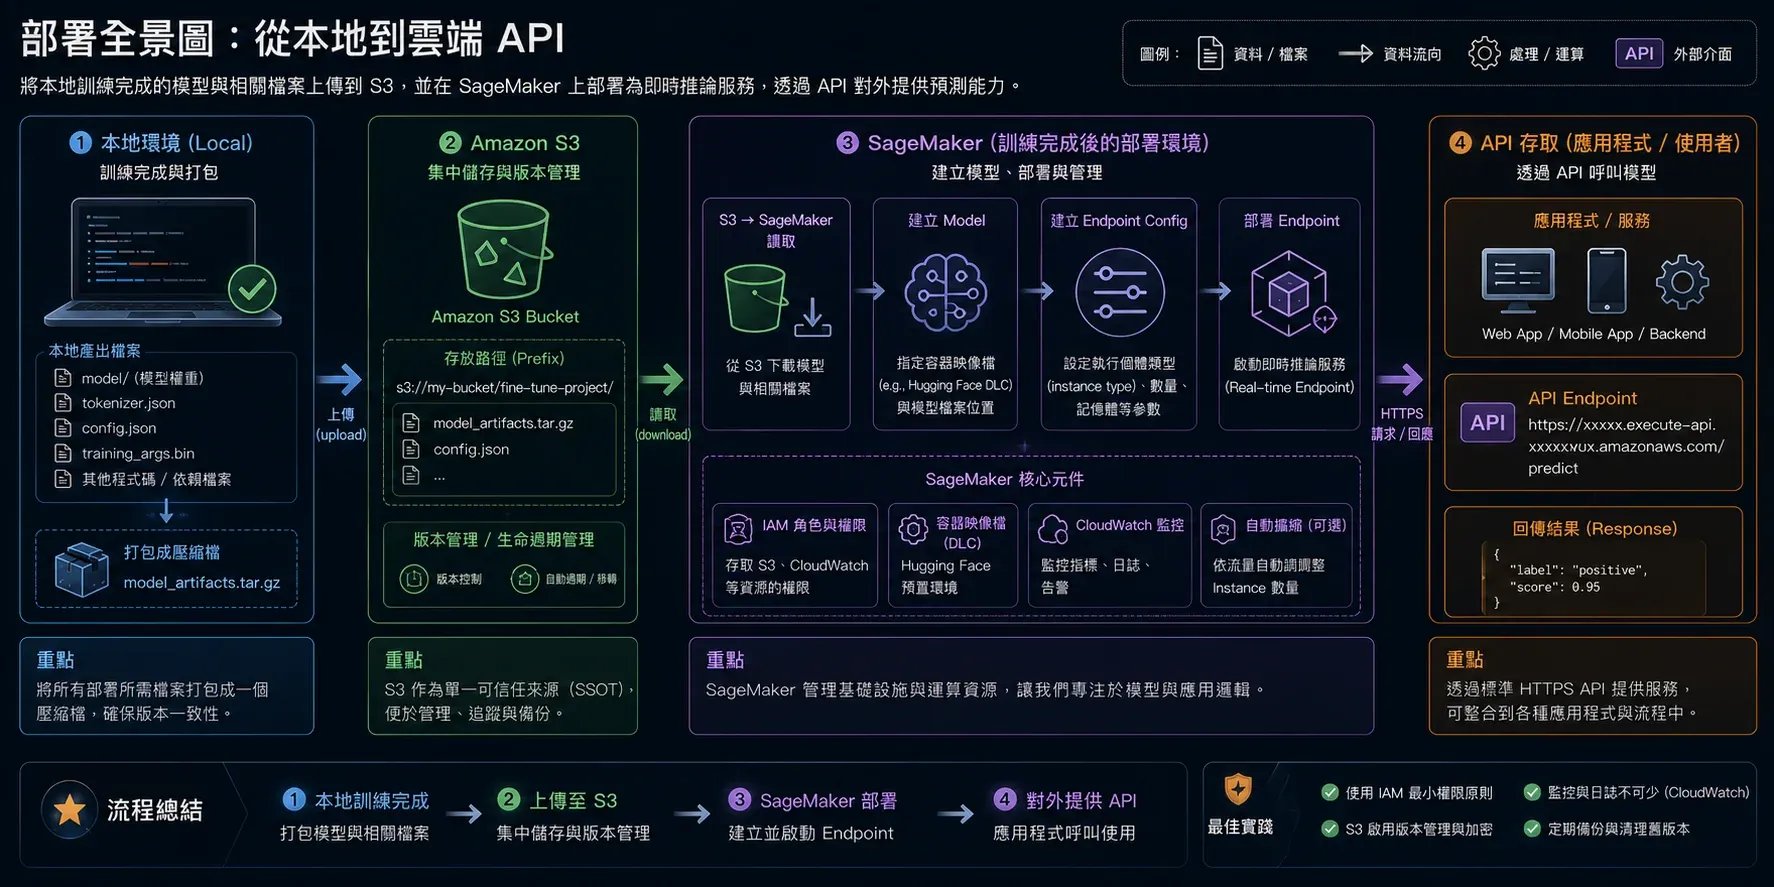
圖1 ▲ Local fine-tuned 模型 → 打包 tar.gz → S3 → SageMaker Endpoint,完整數據流向總覽
背景知識
為什麼選 SageMaker?
SageMaker 是 AWS 的 ML 全套服務,在部署這個環節的優勢:
- 不需要自己管 Docker:SageMaker 內建 HuggingFace container,你只需要提供模型檔案和一個
inference.py - 自動處理擴縮容:流量大時自動增加 instance
- 和 AWS 生態系整合:CloudWatch 監控、API Gateway、IAM 權限控管
SageMaker 部署三步驟
1. Model    → 告訴 SageMaker 模型在哪(S3)、用什麼 container
2. Endpoint Config → 決定用什麼機器規格、幾台
3. Endpoint → 實際啟動服務(幾分鐘後變成 HTTPS API)
用 Python SDK 的話,huggingface_model.deploy() 會把 2、3 步合起來幫你做(物件關係如圖 4 所示)。
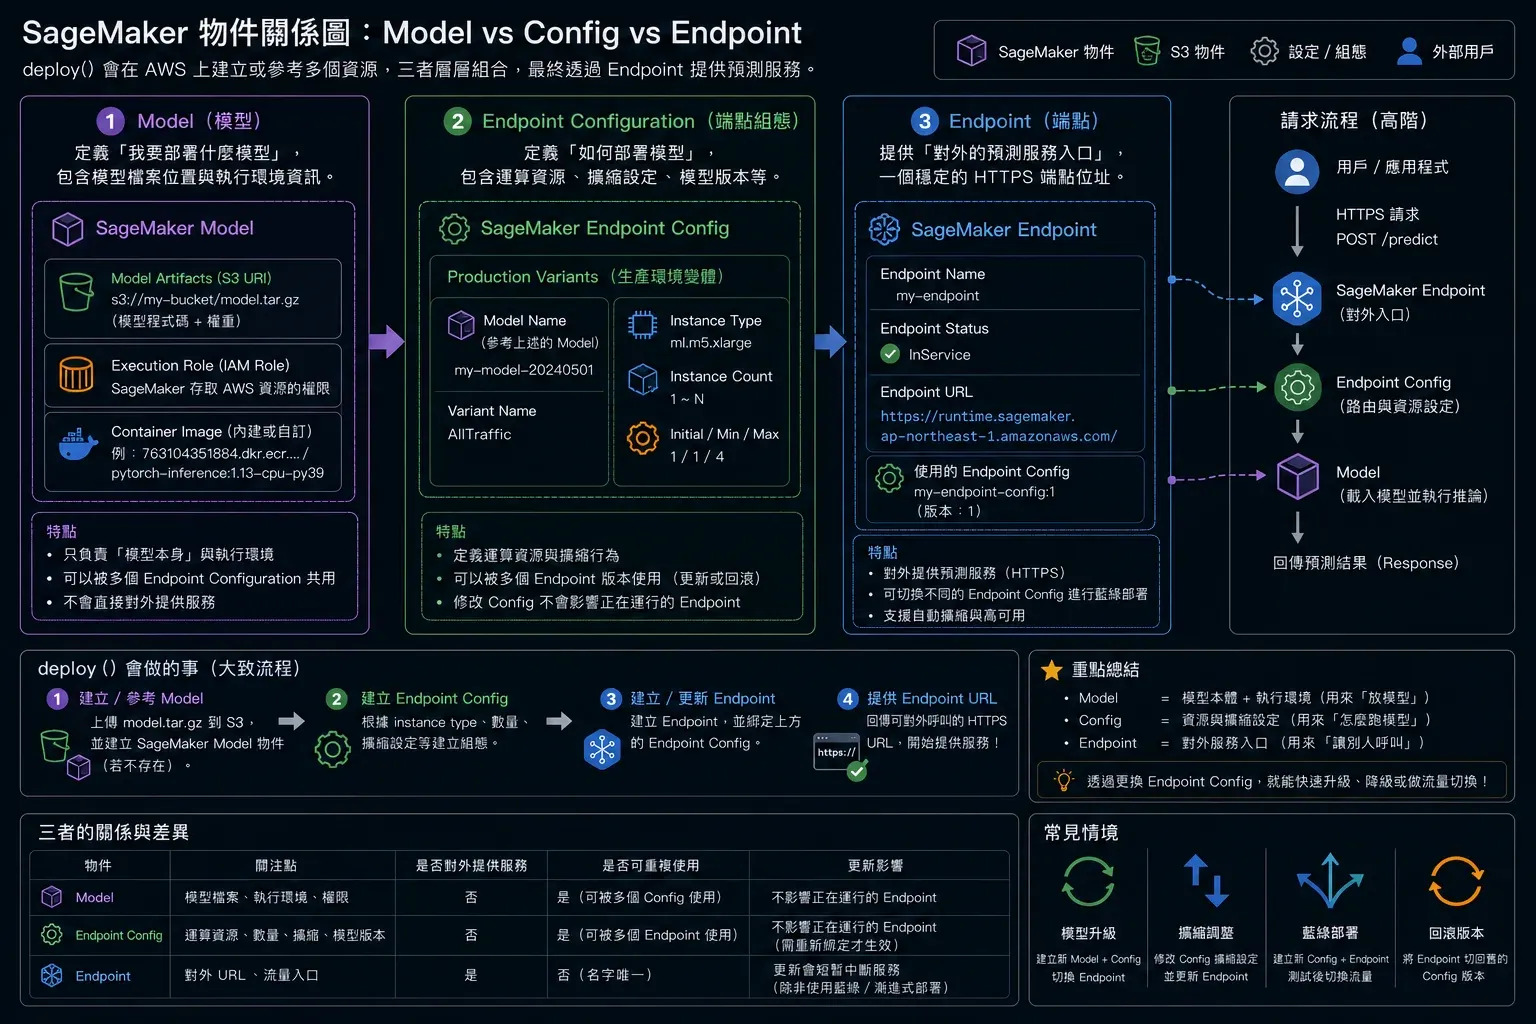
圖4 ▲ deploy() 背後產生的三層 AWS 資源:Model → Endpoint Config → Endpoint,以及它們之間的層次關係
Instance Type 選擇
| Instance | 規格 | 費用(us-west-2) | 適用 |
|---|---|---|---|
ml.m5.large | 2 vCPU, 8GB RAM | ~$0.115/hr | 測試、小模型 |
ml.m5.xlarge | 4 vCPU, 16GB RAM | ~$0.23/hr | 中等模型 |
ml.g4dn.xlarge | 4 vCPU + T4 GPU | ~$0.736/hr | 大模型、高流量 |
Phase 4 實作解析
第一步:初始化 AWS 設定
Phase 4 使用一個 aws_config.json 管理所有設定,方便後續步驟共用:
# phase4/01_setup_aws.py
import boto3
import sagemaker
import json

session    = sagemaker.Session()
region     = session.boto_region_name
bucket     = session.default_bucket()
role       = sagemaker.get_execution_role()
account_id = boto3.client("sts").get_caller_identity()["Account"]

config = {
    "region":     region,
    "bucket":     bucket,
    "role":       role,
    "account_id": account_id,
    "s3_prefix":  "mlops-sentiment",
}

with open("./phase4/aws_config.json", "w") as f:
    json.dump(config, f, indent=2)
第二步:打包模型
SageMaker 要求模型打包成 model.tar.gz,格式如下(如圖 2 所示):
model.tar.gz
├── pytorch_model.bin      ← 模型權重
├── config.json            ← 模型架構設定
├── tokenizer_config.json  ← tokenizer 設定
├── vocab.txt
└── code/
    └── inference.py       ← SageMaker 推論入口(必要)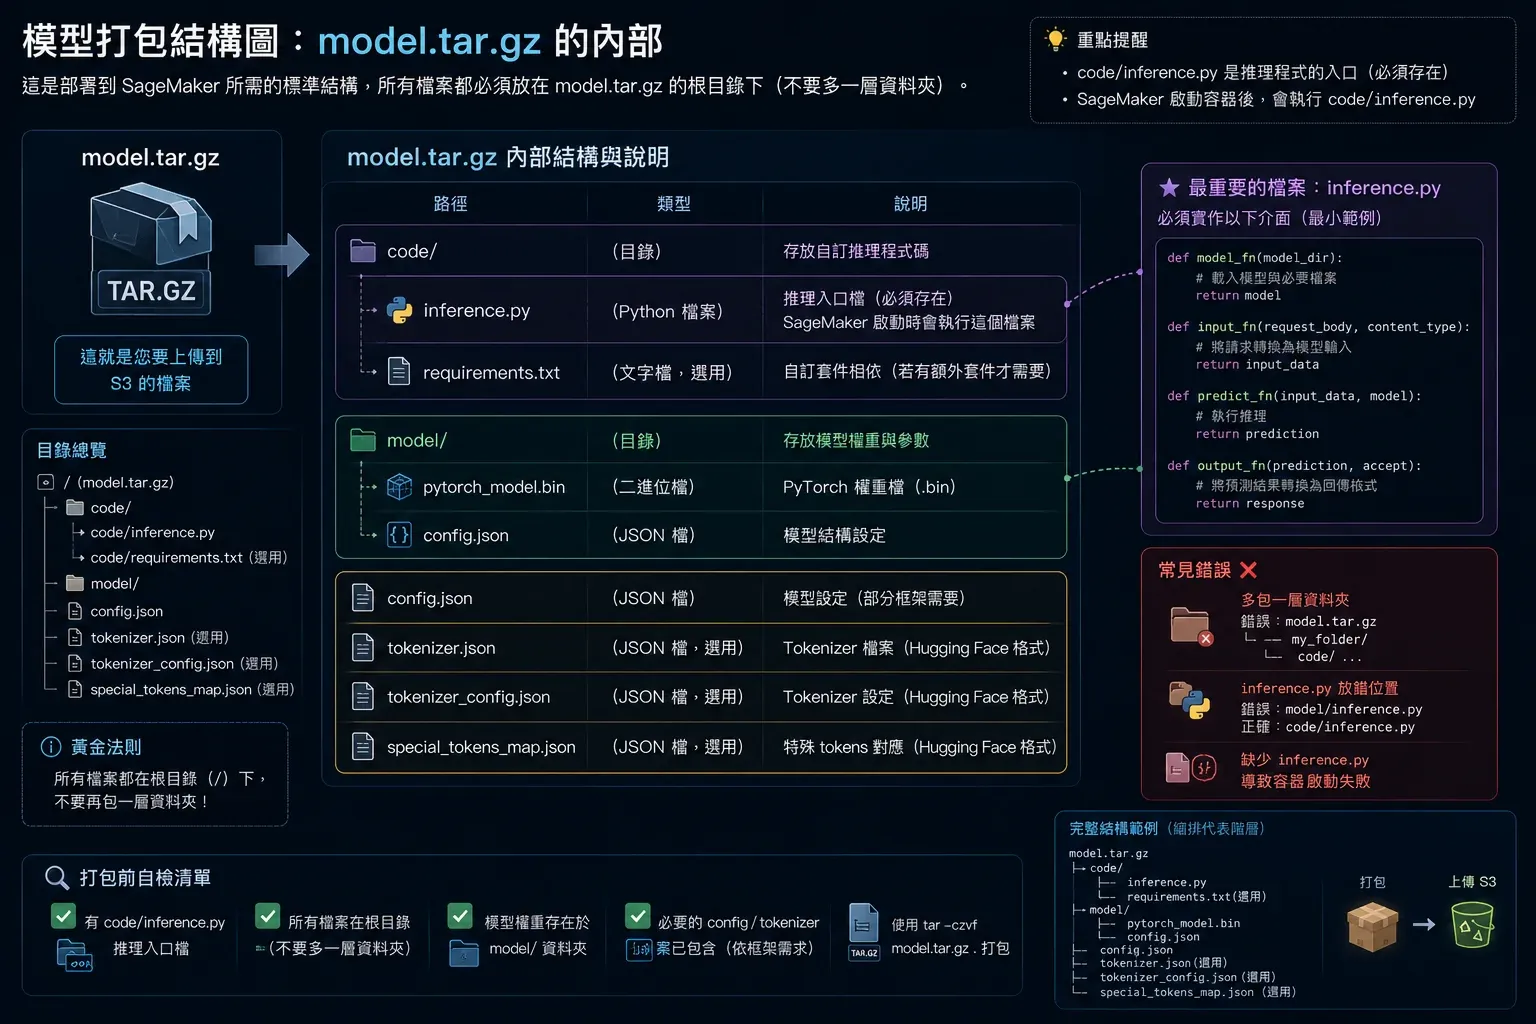
圖2 ▲ model.tar.gz 內部結構:模型權重、config、tokenizer 設定,加上必要的 code/inference.py 推論入口
inference.py 是 SageMaker 呼叫的入口,需要實作四個函式(如圖 3 所示):
# code/inference.py
import json
import torch
import torch.nn.functional as F
from transformers import AutoTokenizer, AutoModelForSequenceClassification

LABELS = {0: "負面", 1: "正面"}

def model_fn(model_dir):
    """SageMaker 啟動時呼叫一次,載入模型"""
    tokenizer = AutoTokenizer.from_pretrained(model_dir)
    model     = AutoModelForSequenceClassification.from_pretrained(model_dir)
    model.eval()
    return {"model": model, "tokenizer": tokenizer}

def input_fn(request_body, content_type="application/json"):
    """解析 HTTP 請求 body"""
    return json.loads(request_body)

def predict_fn(input_data, model_dict):
    """實際做推論,每次 API 呼叫時執行"""
    model     = model_dict["model"]
    tokenizer = model_dict["tokenizer"]
    texts     = input_data.get("texts", [])

    inputs = tokenizer(texts, return_tensors="pt",
                       truncation=True, padding=True, max_length=128)

    with torch.no_grad():
        logits = model(**inputs).logits

    probs = F.softmax(logits, dim=-1)
    return [
        {"text": t, "label": LABELS[probs[i].argmax().item()],
         "confidence": round(probs[i].max().item(), 4)}
        for i, t in enumerate(texts)
    ]

def output_fn(prediction, accept="application/json"):
    """序列化回傳給呼叫方"""
    return json.dumps(prediction, ensure_ascii=False), accept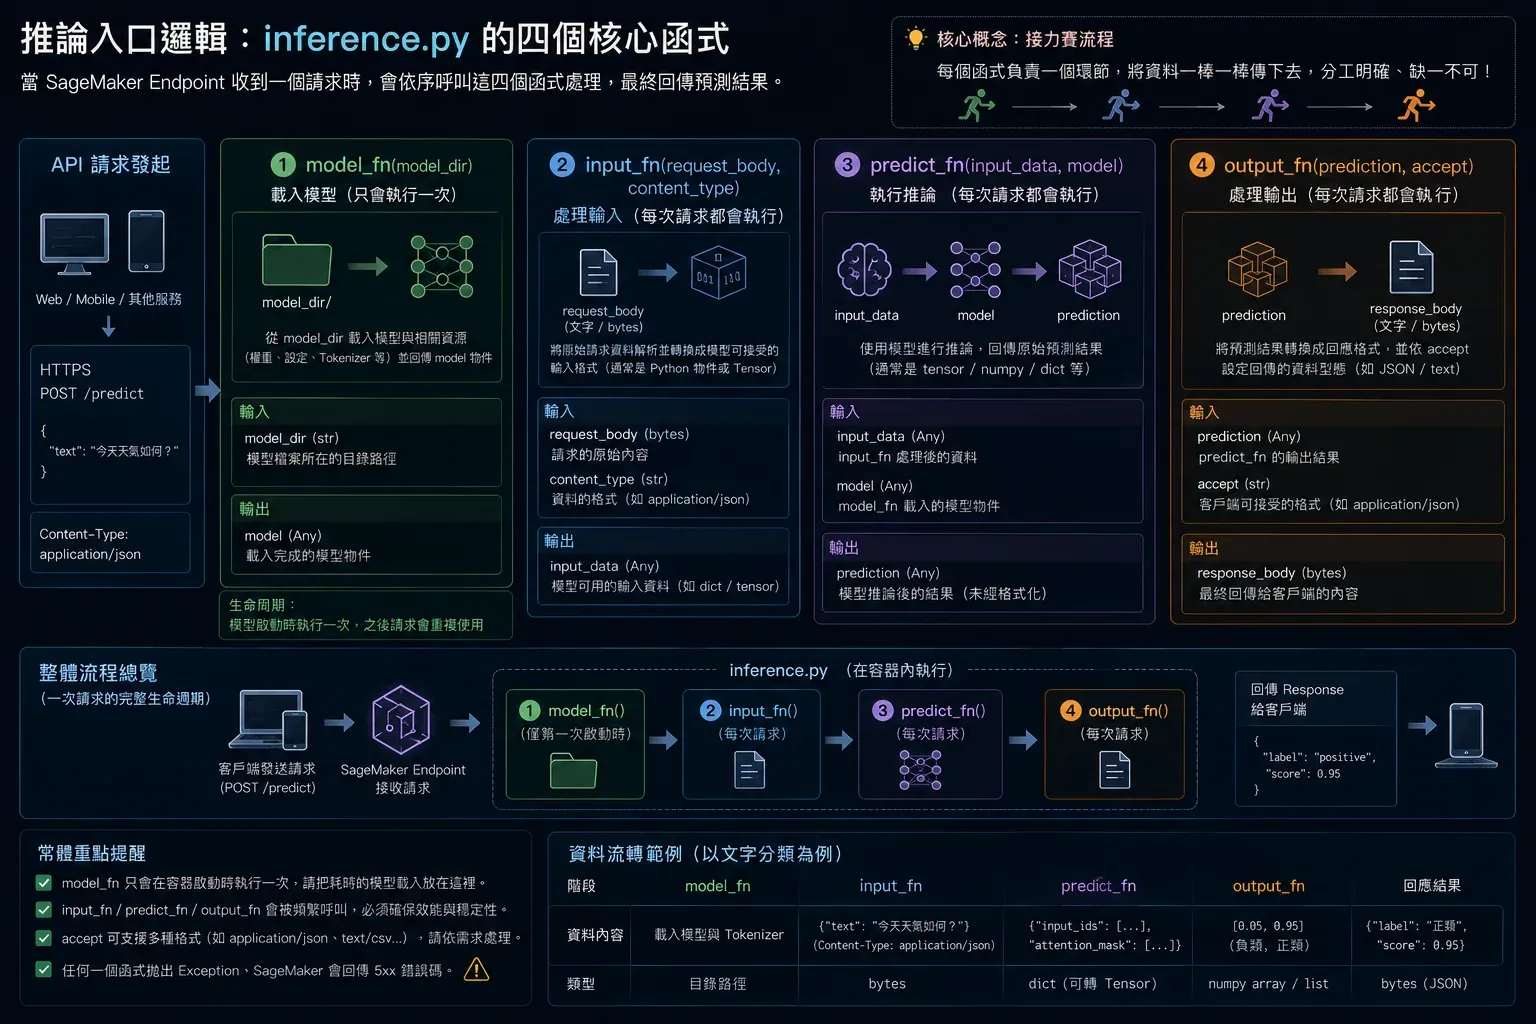
圖3 ▲ SageMaker 呼叫 inference.py 的四函式接力:model_fn(載入)→ input_fn(解析請求)→ predict_fn(推論)→ output_fn(序列化回傳)
打包:
import tarfile, os, shutil

# 複製模型檔案到 model_package/
MODEL_SRC = "./phase3/finetuned_model"
MODEL_DST = "./phase4/model_package"
os.makedirs(f"{MODEL_DST}/code", exist_ok=True)

for fname in os.listdir(MODEL_SRC):
    shutil.copy2(f"{MODEL_SRC}/{fname}", f"{MODEL_DST}/{fname}")

# 打包成 tar.gz
with tarfile.open("./phase4/model.tar.gz", "w:gz") as tar:
    for fname in os.listdir(MODEL_DST):
        tar.add(f"{MODEL_DST}/{fname}", arcname=fname)
第三步:上傳到 S3
import boto3

s3_key = "mlops-sentiment/model/model.tar.gz"
s3_uri = f"s3://{bucket}/{s3_key}"

boto3.client("s3").upload_file(
    "./phase4/model.tar.gz",
    bucket,
    s3_key,
)

print(f"上傳完成:{s3_uri}")
第四步:部署 Endpoint
import sagemaker
from sagemaker.huggingface import HuggingFaceModel

huggingface_model = HuggingFaceModel(
    model_data=s3_uri,
    role=role,
    transformers_version="4.37",
    pytorch_version="2.1",
    py_version="py310",
)

predictor = huggingface_model.deploy(
    initial_instance_count=1,
    instance_type="ml.m5.large",
    endpoint_name="mlops-sentiment-endpoint",
)

print("Endpoint 部署完成!")
deploy() 背後做了什麼:
- 啟動 EC2 instance(
ml.m5.large) - 拉取 HuggingFace Docker container
- 從 S3 下載
model.tar.gz並解壓 - 執行
model_fn()載入模型 - 等待健康檢查通過後,endpoint 變成
InService
整個過程約 5-10 分鐘。
第五步:呼叫 Endpoint
import boto3, json

runtime = boto3.client("sagemaker-runtime", region_name=region)

payload = {"texts": [
    "This movie was absolutely amazing!",
    "I wasted two hours of my life.",
]}

response = runtime.invoke_endpoint(
    EndpointName="mlops-sentiment-endpoint",
    ContentType="application/json",
    Body=json.dumps(payload),
)

result = json.loads(response["Body"].read())
print(result)
# [{"text": "This movie...", "label": "正面", "confidence": 0.9876},
#  {"text": "I wasted...",   "label": "負面", "confidence": 0.9921}]
也可以比較同一筆輸入在 baseline 模型和 fine-tuned 模型的差異:
# compare_models.py
models = {
    "distilbert-base(未訓練)": "mlops-baseline-endpoint",
    "fine-tuned(Phase 3)":    "mlops-sentiment-endpoint",
}

for name, endpoint in models.items():
    resp = invoke(endpoint, test_texts)
    print(f"{name}: accuracy = {compute_accuracy(resp):.2%}")
重要:用完記得刪除 Endpoint
Endpoint 只要是 InService 就持續計費(費用與監控詳見圖 5):
predictor.delete_endpoint()
# 或
boto3.client("sagemaker").delete_endpoint(EndpointName="mlops-sentiment-endpoint")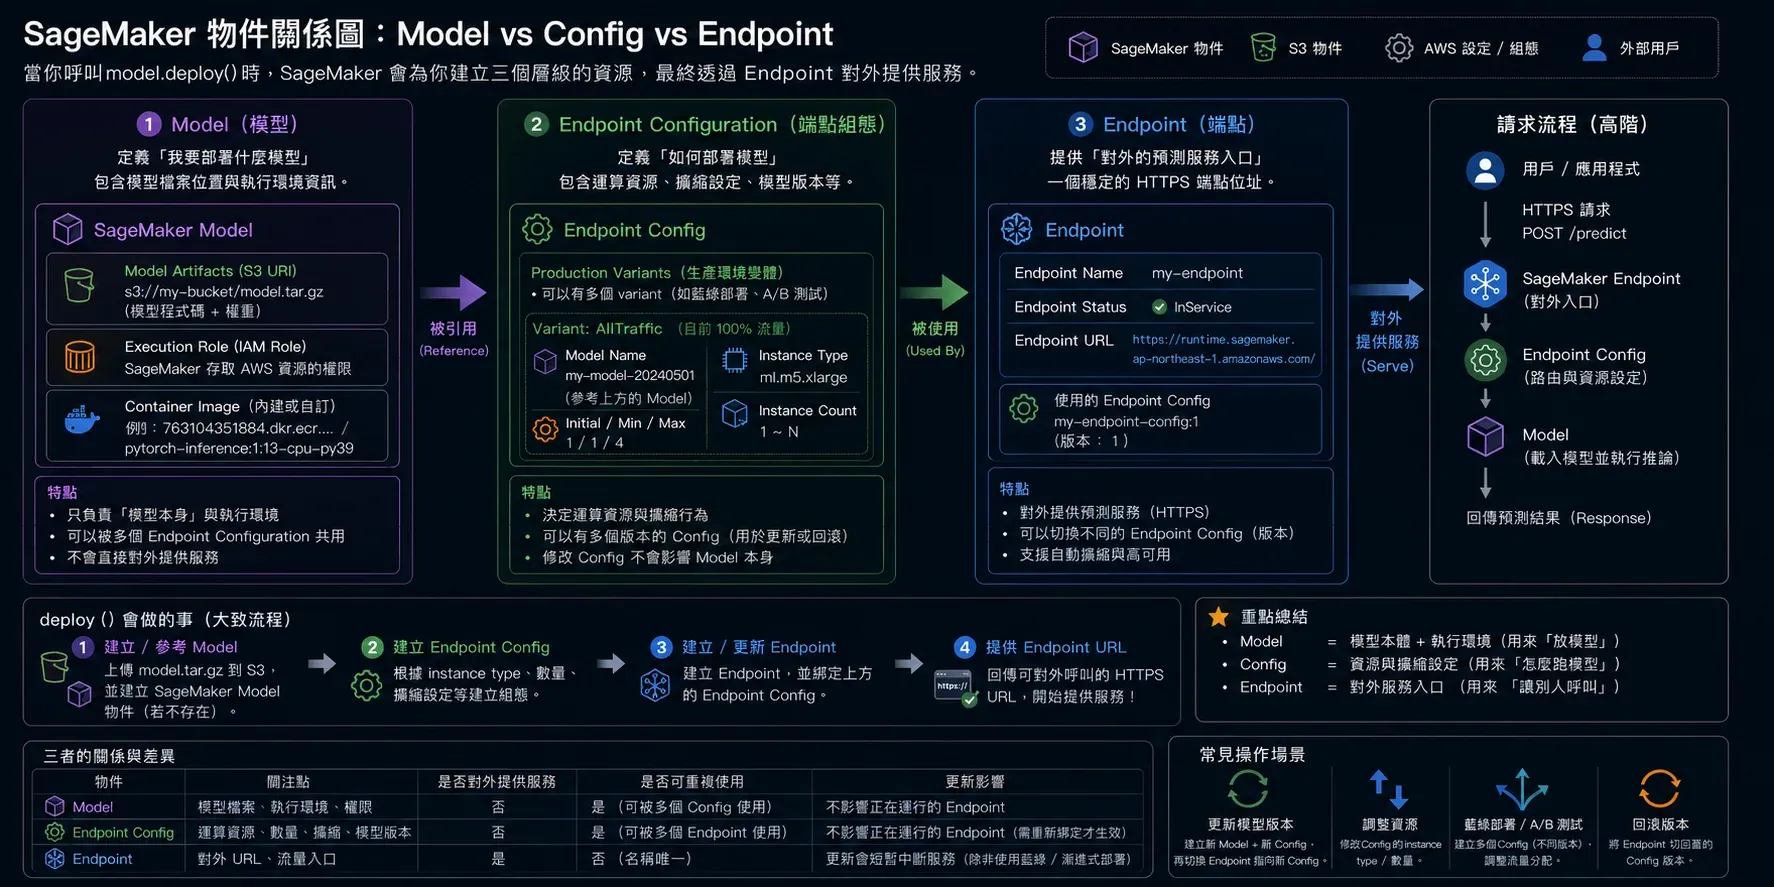
圖5 ▲ Endpoint 計費模式(InService 持續收費)、CloudWatch 監控指標,以及刪除 Endpoint 停止計費的操作流程
小結
| 步驟 | 工具 | 重點 |
|---|---|---|
| 打包 | tarfile | 結構:模型檔案 + code/inference.py |
| inference.py | HuggingFace | 實作 model_fn / predict_fn / input_fn / output_fn |
| 上傳 | boto3 S3 | upload_file() |
| 部署 | HuggingFaceModel.deploy() | 指定 instance type,費用注意 |
| 呼叫 | sagemaker-runtime | invoke_endpoint() |
| 清理 | delete_endpoint() | 用完立刻刪,避免持續計費 |
SageMaker 的優勢在於「不用管基礎設施」。你只需要寫
inference.py,其他的(Docker、網路、健康檢查、auto-scaling)SageMaker 幫你管。
下一篇是 Phase 5,把整個流程自動化:Model Registry、SageMaker Pipeline、CI/CD 觸發、以及 CloudWatch 監控。
GitHub
- 完整程式碼:MLOps 學習 repo — phase4