前言
Phase 4 結束後,我已經可以手動把模型部署到 SageMaker。但「手動」就是 MLOps 要解決的問題。
想像一個真實場景:每週有新的訓練資料進來,需要重新訓練模型、評估效果、確認有進步後再更新線上服務。如果每一步都要手動執行,不只費時,也容易出錯——例如忘記評估就直接部署,或者部署了一個 accuracy 下降的模型。
Phase 5 的目標是把整個流程自動化,建立一個完整的 MLOps 閉環(如圖 1 所示):
程式碼 push → CI/CD 觸發 → SageMaker Pipeline
  → 訓練(TrainingStep)
  → 登記到 Model Registry(RegisterStep)
  → 手動 Approve → 部署到 Endpoint
  → CloudWatch 監控(異常自動警報)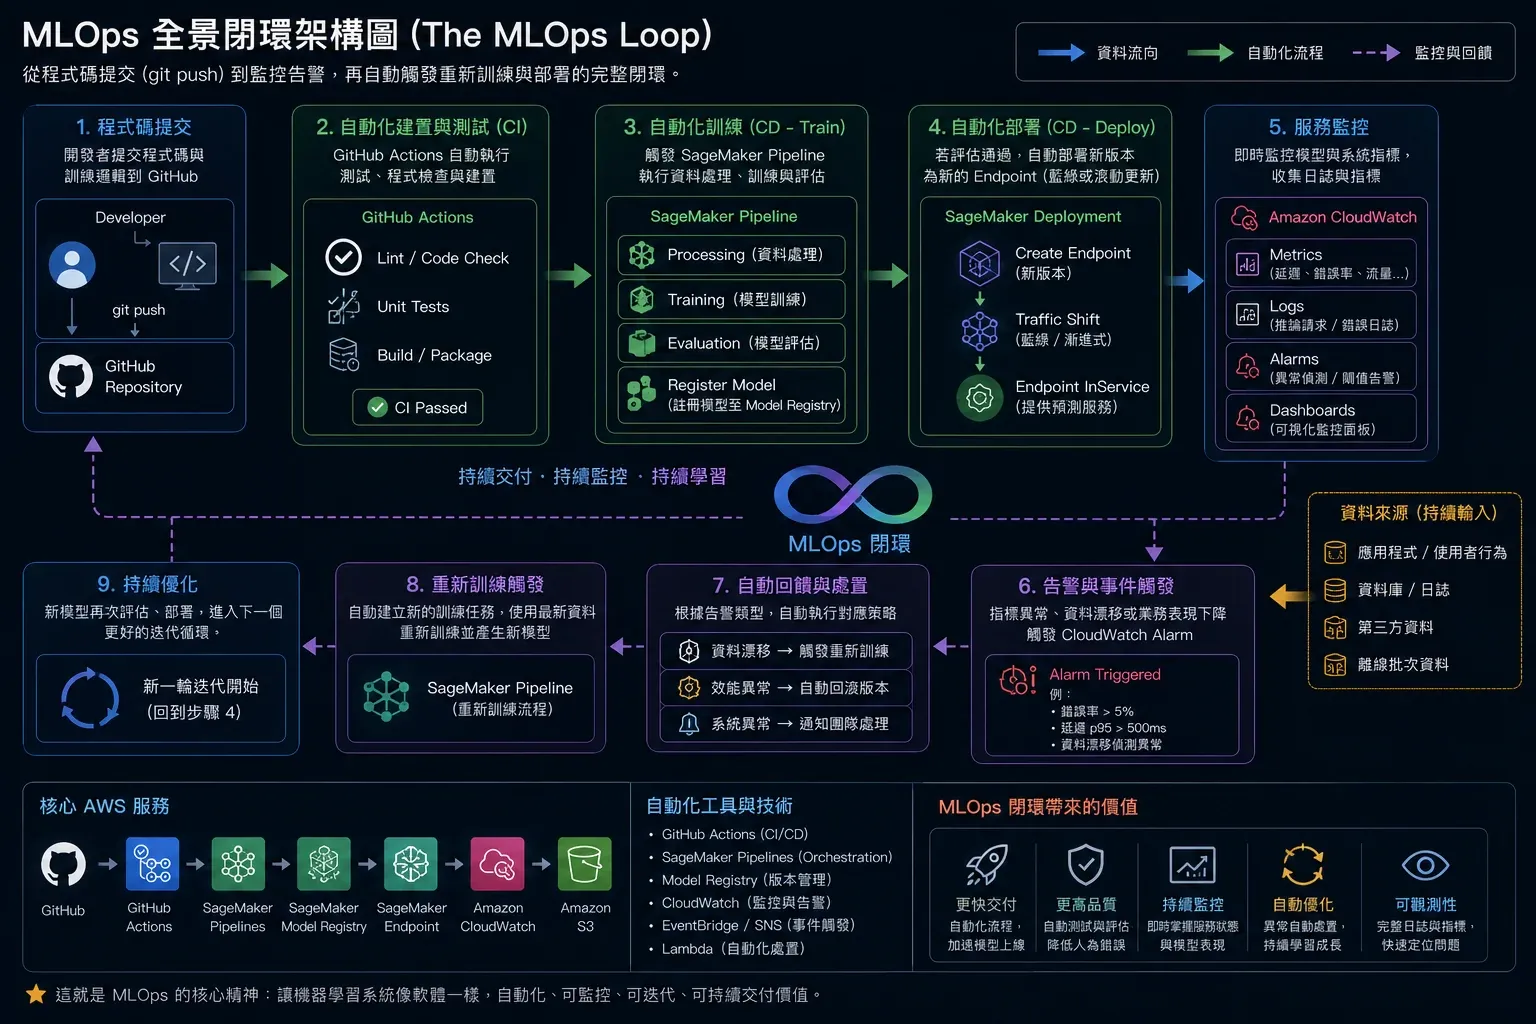
圖1 ▲ MLOps 完整閉環:從 git push 觸發 CI/CD,經 SageMaker Pipeline 訓練、Model Registry 審核、自動部署,到 CloudWatch 監控與異常重訓
背景知識
為什麼需要 Model Registry?
每次 fine-tune 都會產生新模型,沒有版本管理的問題:
- 不知道線上跑的是哪個版本
- 出問題時無法快速 rollback
- 沒有記錄每個版本的 accuracy、訓練資料、超參數
Model Registry 提供:
- 版本號 + 完整 metadata
Approved / Rejected / PendingManualApproval狀態管控- 一鍵 rollback(把舊版本改回 Approved)
SageMaker Pipelines 和一般 CI/CD 的差異
| 一般 CI/CD(Jenkins/Bitbucket) | SageMaker Pipelines | |
|---|---|---|
| 執行環境 | 固定的 CI runner | 動態啟動 SageMaker managed instance |
| 擴縮容 | 需要自己設定 | 自動管理 |
| ML 整合 | 需要自己串 API | 原生支援 Training Job、Model Registry |
| 觸發方式 | push event | 可被 CI/CD 呼叫 |
Phase 5 實作解析
第一步:Model Registry — 版本管理
import boto3, sagemaker

sm = boto3.client("sagemaker")

# 建立 Model Package Group(一個模型專案)
sm.create_model_package_group(
    ModelPackageGroupName="mlops-sentiment-model-group",
    ModelPackageGroupDescription="IMDb 情感分類模型版本管理",
)

# 取得 HuggingFace inference container URI
from sagemaker.image_uris import retrieve
container_uri = retrieve(
    framework="huggingface",
    region=region,
    version="4.37",
    py_version="py310",
    base_framework_version="pytorch2.1.0",
    image_scope="inference",
    instance_type="ml.m5.large",
)

# 登記這次訓練的模型版本
model_package = sm.create_model_package(
    ModelPackageGroupName="mlops-sentiment-model-group",
    ModelPackageDescription="DistilBERT fine-tuned, accuracy=0.84",
    InferenceSpecification={
        "Containers": [{"Image": container_uri, "ModelDataUrl": model_s3_uri}],
        "SupportedContentTypes": ["application/json"],
        "SupportedResponseMIMETypes": ["application/json"],
        "SupportedRealtimeInferenceInstanceTypes": ["ml.m5.large"],
    },
    CustomerMetadataProperties={
        "accuracy":      "0.84",
        "f1_score":      "0.83",
        "train_samples": "500",
        "base_model":    "distilbert-base-uncased",
    },
)

# 審核(實際流程:ML 工程師確認指標達標後 Approve)
sm.update_model_package(
    ModelPackageArn=model_package["ModelPackageArn"],
    ModelApprovalStatus="Approved",
)
列出所有版本(如圖 2 所示):
versions = sm.list_model_packages(
    ModelPackageGroupName="mlops-sentiment-model-group",
    SortBy="CreationTime",
    SortOrder="Descending",
)

for v in versions["ModelPackageSummaryList"]:
    print(f"版本 {v['ModelPackageVersion']}: [{v['ModelApprovalStatus']}]")
# 版本 3: [Approved]
# 版本 2: [Rejected]
# 版本 1: [Approved]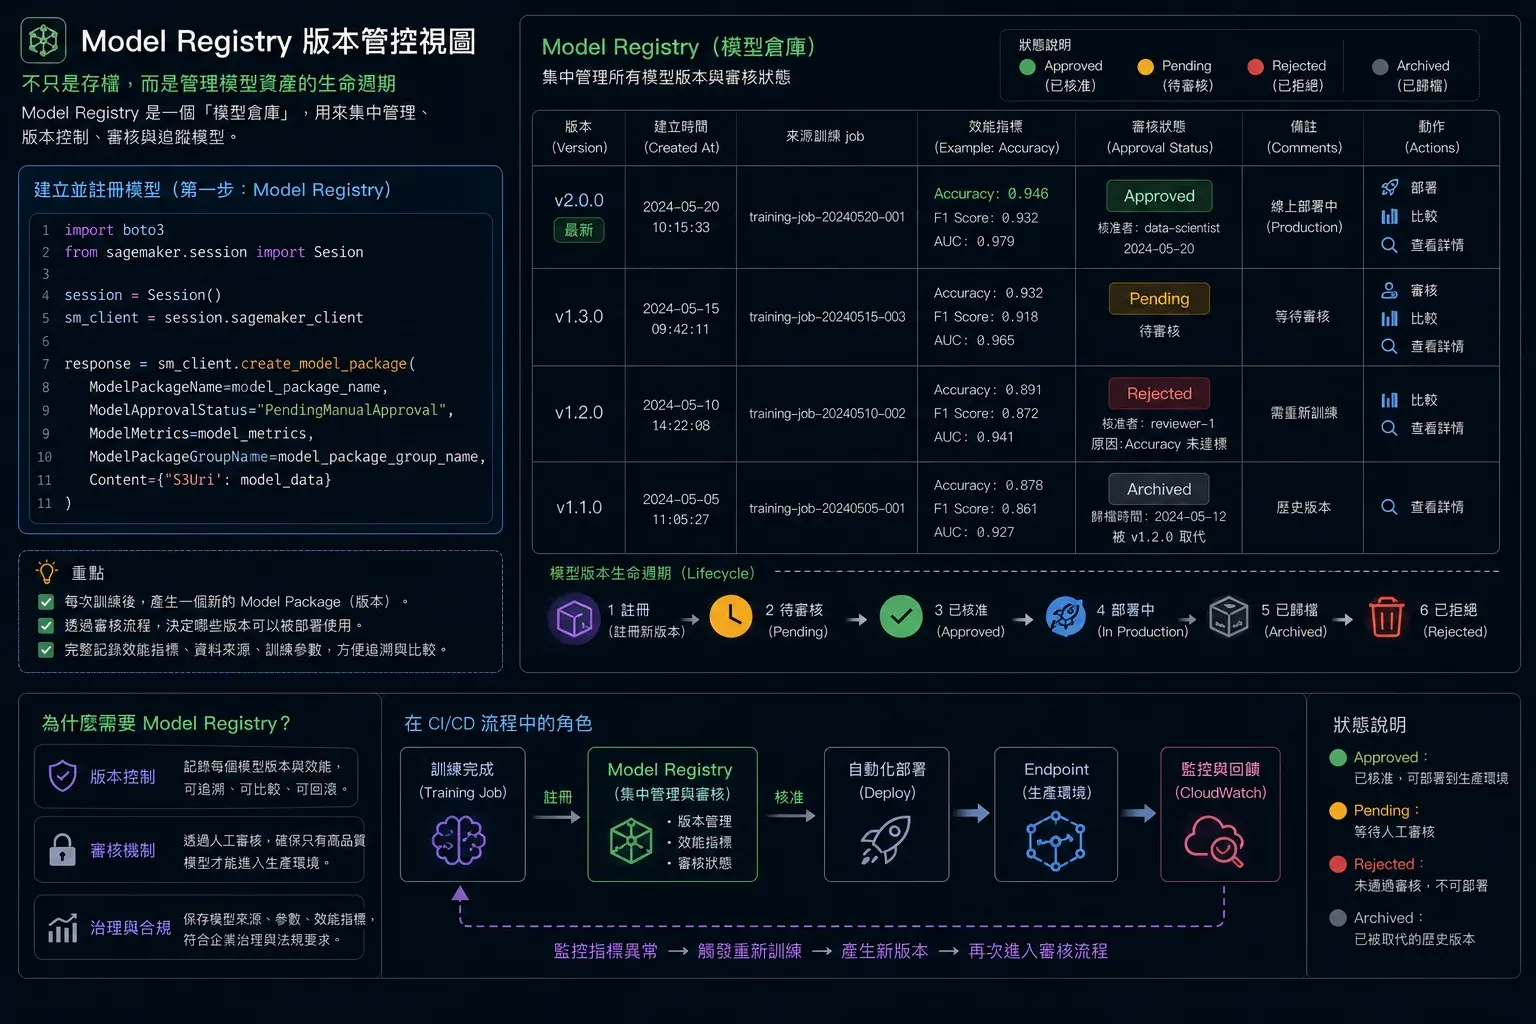
圖2 ▲ Model Registry 版本管控:每次訓練產生新版本,記錄 accuracy/F1 等指標,透過 Approved/Rejected/PendingManualApproval 狀態控管部署流程
第二步:SageMaker Pipeline — 自動化訓練→登記
Pipeline 把各個步驟串成有向圖(DAG)(如圖 3 所示),每次執行時按順序跑:
from sagemaker.workflow.pipeline import Pipeline
from sagemaker.workflow.steps import TrainingStep
from sagemaker.workflow.model_step import ModelStep
from sagemaker.workflow.parameters import ParameterString
from sagemaker.huggingface import HuggingFace, HuggingFaceModel

# Pipeline 參數(執行時可覆蓋)
model_approval_status = ParameterString(
    name="ModelApprovalStatus",
    default_value="PendingManualApproval",
)

# Training Step
huggingface_estimator = HuggingFace(
    entry_point="train.py",
    source_dir="./phase5/scripts/train",
    role=role,
    instance_count=1,
    instance_type="ml.g4dn.xlarge",  # GPU 加速
    transformers_version="4.26",
    pytorch_version="1.13",
    py_version="py39",
    hyperparameters={
        "num_train_samples": 2000,
        "epochs": 2,
        "learning_rate": 2e-5,
    },
)

step_train = TrainingStep(name="TrainModel", estimator=huggingface_estimator)

# Register Step(把訓練結果登記到 Model Registry)
huggingface_model = HuggingFaceModel(
    model_data=step_train.properties.ModelArtifacts.S3ModelArtifacts,
    role=role,
    transformers_version="4.26",
    pytorch_version="1.13",
    py_version="py39",
    sagemaker_session=pipeline_session,
)

step_register = ModelStep(
    name="RegisterModel",
    step_args=huggingface_model.register(
        content_types=["application/json"],
        response_types=["application/json"],
        inference_instances=["ml.g4dn.xlarge"],
        model_package_group_name="mlops-sentiment-model-group",
        approval_status=model_approval_status,
    ),
)

# 組合成 Pipeline
pipeline = Pipeline(
    name="mlops-sentiment-pipeline",
    parameters=[model_approval_status],
    steps=[step_train, step_register],
)

pipeline.upsert(role_arn=role)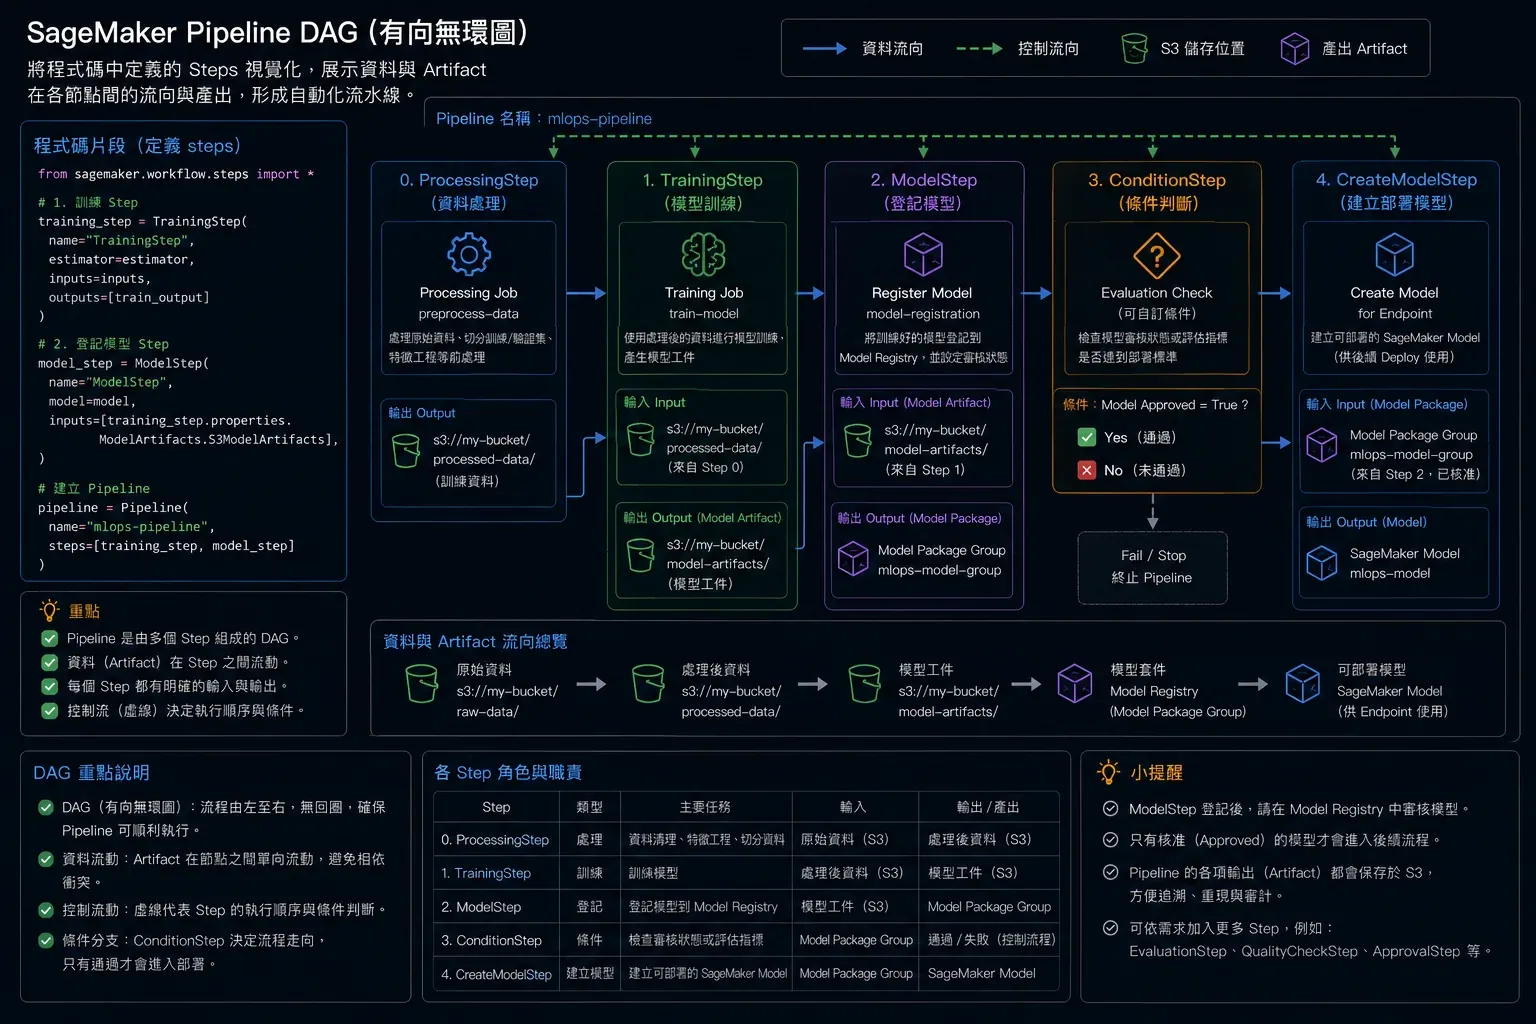
圖3 ▲ SageMaker Pipeline DAG:Processing → Training → RegisterModel 各 Step 的依賴關係,以及每個 Step 產出的 Artifact 流向
執行 Pipeline:
execution = pipeline.start(
    parameters={"ModelApprovalStatus": "PendingManualApproval"}
)

execution.wait()  # 等待完成
print(execution.describe()["PipelineExecutionStatus"])  # Succeeded
第三步:CI/CD 整合
Pipeline 可以被 CI/CD 觸發。兩種常見做法:
Bitbucket Pipelines(04a_bitbucket_pipeline.yml):
image: python:3.10

pipelines:
  branches:
    main:
      - step:
          name: Trigger SageMaker Pipeline
          script:
            - pip install sagemaker boto3
            - python -c "
                import sagemaker, boto3
                from sagemaker.workflow.pipeline import Pipeline

                pipeline = Pipeline.describe(
                    name='mlops-sentiment-pipeline',
                    sagemaker_session=sagemaker.Session()
                )
                execution = pipeline.start(
                    parameters={'ModelApprovalStatus': 'PendingManualApproval'}
                )
                print(f'Pipeline started: {execution.arn}')
              "
Jenkins Pipeline(04b_jenkins_pipeline.groovy):
pipeline {
    agent any
    stages {
        stage('Trigger SageMaker Pipeline') {
            steps {
                sh '''
                    pip install sagemaker boto3
                    python trigger_pipeline.py
                '''
            }
        }
        stage('Wait for Training') {
            steps {
                sh 'python wait_for_pipeline.py'
            }
        }
        stage('Deploy if Approved') {
            steps {
                sh 'python deploy_if_approved.py'
            }
        }
    }
}
第四步:API Gateway — 公開 API
SageMaker Endpoint 是私有的(只能在 AWS VPC 內呼叫),要讓外部系統呼叫,需要加一層 API Gateway + Lambda:
# 03_api_gateway.py
import boto3, json

lambda_client = boto3.client("lambda")

# Lambda 函式:接收外部請求,轉發給 SageMaker Endpoint
lambda_code = '''
import boto3, json

def handler(event, context):
    runtime = boto3.client("sagemaker-runtime")

    body = json.loads(event["body"])
    response = runtime.invoke_endpoint(
        EndpointName="mlops-sentiment-endpoint",
        ContentType="application/json",
        Body=json.dumps(body),
    )

    result = json.loads(response["Body"].read())
    return {
        "statusCode": 200,
        "headers": {"Content-Type": "application/json"},
        "body": json.dumps(result, ensure_ascii=False),
    }
'''
架構(如圖 4 所示):
外部請求
  → API Gateway(HTTPS 端點)
  → Lambda(轉發、鑑權)
  → SageMaker Endpoint(推論)
  → 回傳結果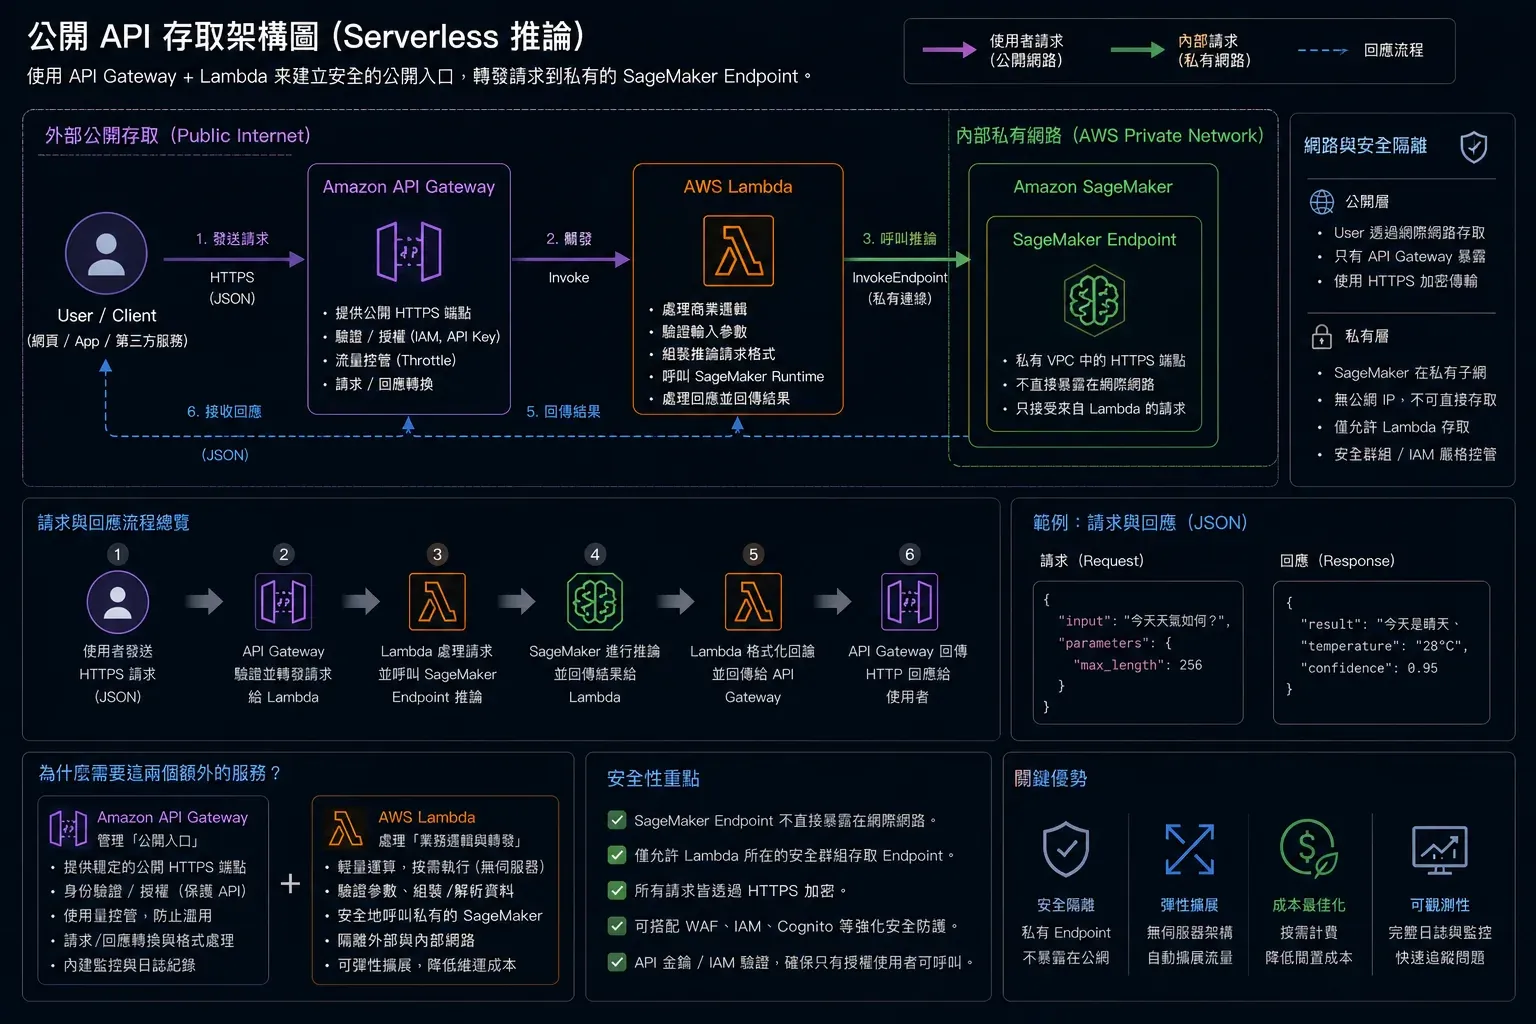
圖4 ▲ Serverless 公開 API 架構:外部請求經 API Gateway → Lambda 轉發鑑權 → SageMaker Endpoint 推論,讓私有 Endpoint 安全對外服務
第五步:CloudWatch 監控
模型上線後需要持續監控三個核心指標:
import boto3
cw = boto3.client("cloudwatch")

alarms = [
    {
        "name":       "high-latency",
        "metric":     "ModelLatency",
        "threshold":  2_000_000,  # 2 秒(單位:微秒)
        "statistic":  "p99",
        "description": "推論 P99 延遲 > 2 秒"
    },
    {
        "name":       "high-error-rate",
        "metric":     "Invocation5XXErrors",
        "threshold":  5,
        "description": "5xx 錯誤率 > 5%"
    },
    {
        "name":       "no-traffic",
        "metric":     "Invocations",
        "threshold":  0,
        "period":     1800,  # 30 分鐘
        "description": "超過 30 分鐘沒有流量"
    },
]

for alarm in alarms:
    cw.put_metric_alarm(
        AlarmName=f"mlops-sentiment-{alarm['name']}",
        Namespace="AWS/SageMaker",
        MetricName=alarm["metric"],
        Dimensions=[
            {"Name": "EndpointName", "Value": "mlops-sentiment-endpoint"},
            {"Name": "VariantName",  "Value": "AllTraffic"},
        ],
        Period=alarm.get("period", 300),
        EvaluationPeriods=2,
        Threshold=alarm["threshold"],
        ComparisonOperator="GreaterThanThreshold",
        Statistic=alarm.get("statistic", "Average"),
        AlarmActions=[sns_topic_arn],  # 警報時發 Email / Slack
    )
CloudWatch Dashboard 把延遲、流量、錯誤率集中顯示:
dashboard_body = {
    "widgets": [
        {
            "type": "metric",
            "properties": {
                "title": "推論延遲(P50 / P90 / P99)",
                "metrics": [
                    ["AWS/SageMaker", "ModelLatency", ..., {"stat": "Average", "label": "P50"}],
                    ["...", {"stat": "p90", "label": "P90"}],
                    ["...", {"stat": "p99", "label": "P99"}],
                ],
            },
        },
        {
            "type": "metric",
            "properties": {
                "title": "每分鐘呼叫次數",
                "metrics": [["AWS/SageMaker", "Invocations", ...]],
            },
        },
    ]
}

cw.put_dashboard(
    DashboardName="MLOps-SentimentEndpoint",
    DashboardBody=json.dumps(dashboard_body),
)
警報通知流程:
CloudWatch 偵測到異常
  → 觸發 SNS Topic
  → 寄 Email 通知
  → 也可接 Slack / PagerDuty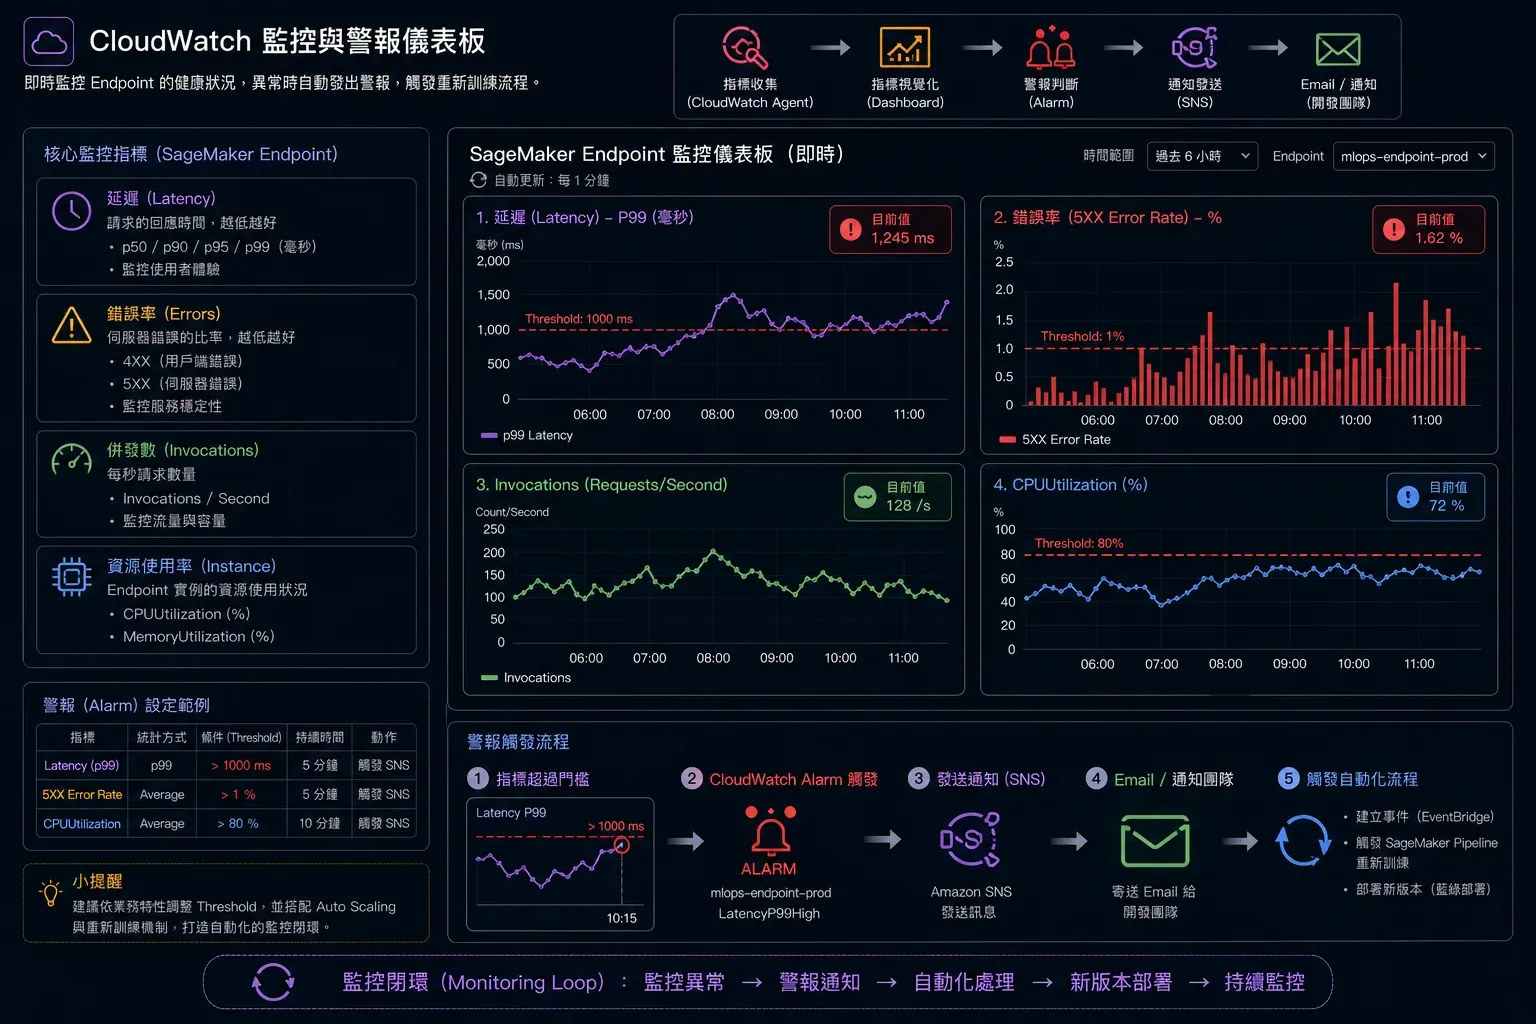
圖5 ▲ CloudWatch 監控儀表板:延遲(P50/P90/P99)、每秒呼叫次數、CPU 使用率,搭配 Alarm 觸發 SNS 通知的完整警報鏈路
完整 MLOps 閉環
把五個 Phase 串起來,整個系統是這樣運作的:
[資料更新]
    ↓
[git push 到 main branch]
    ↓
[CI/CD 觸發(Bitbucket / Jenkins)]
    ↓
[SageMaker Pipeline]
  TrainingStep  → 在 ml.g4dn.xlarge 上 fine-tune 2000 筆資料
  RegisterStep  → 登記到 Model Registry(PendingManualApproval)
    ↓
[ML 工程師審核指標,accuracy 達標 → Approve]
    ↓
[自動部署到 SageMaker Endpoint]
    ↓
[API Gateway + Lambda 對外服務]
    ↓
[CloudWatch 持續監控延遲 / 錯誤率 / 流量]
    ↓
[異常時 SNS 警報通知]
    ↓
[必要時觸發重新訓練,形成閉環]
小結
| 元件 | 工具 | 職責 |
|---|---|---|
| 版本管理 | SageMaker Model Registry | 記錄每次訓練的指標和狀態 |
| 自動化訓練 | SageMaker Pipelines | 串接 Training → Register |
| CI/CD 觸發 | Bitbucket / Jenkins | push 程式碼自動啟動 Pipeline |
| 公開 API | API Gateway + Lambda | 把 Endpoint 包成 HTTPS API |
| 監控 | CloudWatch + SNS | 延遲 / 錯誤率 / 流量警報 |
MLOps 的本質是把 ML 工程的各個環節——訓練、評估、部署、監控——用軟體工程的方式管理,讓整個流程可重複、可追溯、自動化。
這個系列走完了從 NumPy 基礎到完整 AWS MLOps 部署的路徑。下一步可以延伸到 LoRA/PEFT 在大型模型上的應用,或是 SageMaker Model Monitor 做更細緻的 data drift 偵測。
GitHub
- 完整程式碼:MLOps 學習 repo — phase5